Only released in EOL distros:
Package Summary
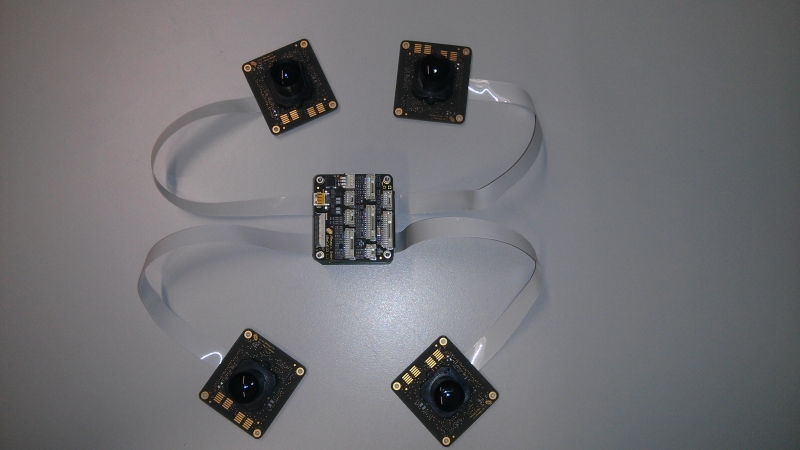
This Package contains a ROS-brige for the VRMagic Smartcameras. There is a ROS-node (vrmagic_ros_bridge_server), which is the Server for the ROS-brige, and firmware for the VRMagic Smartcam. On the Smartcam the User have to implement a firmware and have to use the Class VrMagicHandler_camhost for communication with the vrmagic_ros_bridge_server. Each Image which is transmitted to the vrmagic_ros_bridge_server by using the Class VrMagicHandler_camhost will be published as Image via ROS. Multiple Images are also possible.
- Maintainer: Michael Schmidpeter <schmidpetermi46820 AT th-nuernberg DOT de>
- Author: Michael Schmidpeter <schmidpetermi46820 AT th-nuernberg DOT de>
- License: GPLv2
- Source: git https://github.com/ohm-ros-pkg/vrmagic_drivers.git (branch: master)
Contents

General
This package contains a ROS bridge for the VRMagic smart cameras. It includes a ROS server node named vrmagic_ros_bridge_server, and a firmware interface for VRMagic smart cams. The firmware interface is implemented as C++ class (VrMagicHandler_camhost) and needs to be included in the user's application. Smart cam images are transmitted to the vrmagic_ros_bridge_server via this interface. The camhost server provides a ROS multi-channel publisher for the multi-sensor devices.
Download
Clone this package into your catkin workspace as follows.
 $ cd "Path_to_catkin_ws"/src/"
 $ git clone https://github.com/ohm-ros-pkg/vrmagic_drivers.git
ROS Node
The node receives from the VRMagic smart cam an image via the VrMagicHandler_camhost class. Each image must have an ID representing a specific channel. An individual publisher is instanciated for each ID. The node verifies for incoming images whether a publisher is already instanciated. New publishers are created during runtime with the following convention for the topic name: <base_topic> + ID, (e.g. base_topic:"topicname", ID:1 -> "topicname1").
Parameter
Parameter Name |
Description |
Default Values |
pub_name |
Topic name of image publisher (topicname and ID are concatenated) |
"vrmagic_image_" |
ip_smartcam |
IP address of the VRMagic smart cam |
"192.168.3.101 |
port_smartcam |
PORT of the VRMagic smart cam |
1234 |
Running the ROS Node
Starting the node using rosrun with parameters:
$ rosrun vrmagic_ros_bridge_server vrmagic_ros_bridge_server_node _pub_name:=<topicname> _ip_smartcam:=<ip> _port_smartcam:=<port>
Example with base_topic: "vrmagic_image_", ip: "192.168.3.100", PORT: 1234
$ rosrun vrmagic_ros_bridge_server vrmagic_ros_bridge_server_node _pub_name:=vrmagic_image_ _ip_smartcam:=192.168.3.100 _port_smartcam:=1234
Or use a launch file and roslaunch with the parameters described in Parameter
Firmware Interface
To use the ROS bridge you have to be familiar with the VRMagic camera user guide, which you can find on the VRMagic homepage.
The following steps need to be executed:
- Compile an application with the VRMagic SDK on a host PC or a virtual machine
- Copy the binary to the VRMagic smart cam
- Execute binary on the VRMagic smart cam
API Description
To use the ROS bridge in your applications, the folder VrMagicHandler_camhost in firmware/src/ has to be copied in your application's source folder. You have to add all .cpp files in VrMagicHandler_camhost to your Makefile.
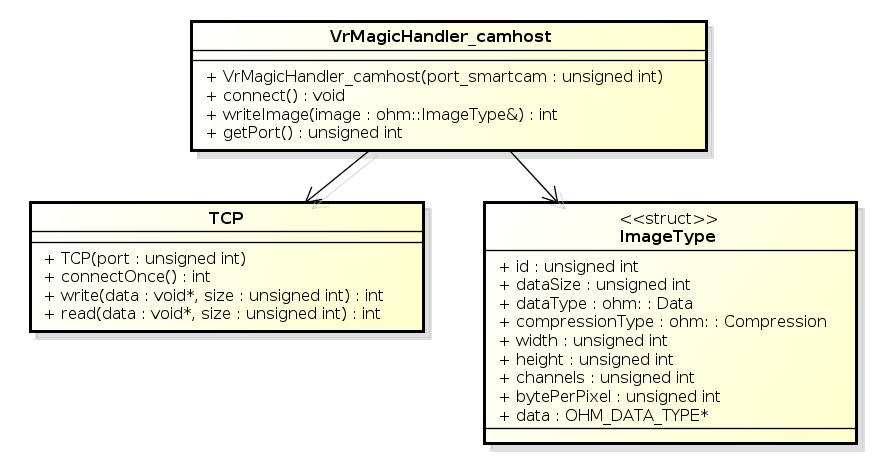
The following image shows a uml class diagram for the API of the smart cam firmware

Note: the following explanations are extracted from demo_app.
In the first step a VrMagicHandler_camhost - object must be instanciated. For that the header file from the class needs to be included.
A connection to the ROS server can be established by calling the connect() method. This method blocks until a connection to the ROS server can be established.
1 rosBrige.connect();
With the method writeImage(ohm::ImageType& image) an image is transmitted to the ROS server. Create and fill an instance of ohm::ImageType with information about the image format. Image data is passed via the pointer variable image_ptr.
IMPORTANT The ROS bridge can handle only monoscaled and BGR images, either with 8 or 16 Bit pixeldepth.
If the image is monoscaled, the field unsigned int channels needs to be set to 1.
If the image is BGR format, the field unsigned int channels needs to be set to 3.
   1  rosImage.id                = sensor_port;
   2  rosImage.dataSize          = width * height * bytePerPixel;
   3  rosImage.dataType          = ohm::IMAGE;  //for now only IMAGE is supported
   4  rosImage.compressionType   = ohm::NONE;   //for now only no compression is supported
   5  rosImage.width             = width;
   6  rosImage.height            = height;
   7  rosImage.channels          = 3;
   8  rosImage.bytePerPixel      = 3;
   9  rosImage.data              = image_ptr;   //ensure image to have correct fromat
  10
Field |
Description |
ohm::ImageType.id |
ID for a channel e.g. sensor port |
ohm::ImageType.dataSize |
size of the image data in [byte] |
ohm::ImageType.dataType |
Type of data. For now just image type is available |
ohm::ImageType.compressionType |
Type of image compression. For now only uncompressed images are possible |
ohm::ImageType.width |
Width of image in [pixel] |
ohm::ImageType.height |
Height of image in [pixel] |
ohm::ImageType.channels |
Channels of image, e.g., MONO = 1, BGR = 3 |
ohm::ImageType.bytePerPixel |
Bytes used for one pixel (channels x pixeldepth) |
ohm::ImageType.data |
Pointer to image data. If the image data is not in the format described in ImageType, then it must be copied in correct format |
After filling the ohm::ImageType-object, it must be transmitted to the ROS bridge with the method writeImage(ohm::ImageType& image), see the following code:
1 rosBrige.writeImage(rosImage);
Typically, this method has to be called after image grabbing.
Compiling
To compile your application including the ROS bridge class, all source files in the folder VrMagicHandler_camhost(don't forget the TCP/TCP.cpp file) must be included in the Makefile. Don't forget to add the include path to the folder VrMagicHandler_camhost/.
Compile your VRMagic application on your host PC or virtual machine as it is described in the user guide of the smart cam.
Example Application
Note: The demo application is written for a D3-Multisensor smart cam from VRMagic.
This application is based on the simple grabbing example application of VRMagic. The demo application is extended with the ROS bridge interface.
The example application is located in the folder firmware/src/demp_app.
To build the demo application, copy the whole firmware folder to the location where the VRMagic SDK is installed (host PC or virtual machine). Type
 $ cd firmware/
 $ make
to build the demo application.
To execute the demo application, copy the binary in firmware/src/demo_app named ros_bridge_demo_app to your VRMagic smart cam. Now execute the demo application on the VRMagic smart cam:
 $ cd where_you_copied_the_binary/
 $ ./ros_bridge_demo_app
Start the ROS bridge server on the ROS host PC. Now you will find a publisher named <your_base_topicname>1
To visualize the image, the standard ROS image_view package can be used:
$ rosrun image_view image_view image:=/<your_base_topicname>1
Note: The ROS bridge specific code in the demo application is labeled with the following comments:
