Planet ROS
Planet ROS - http://planet.ros.org
Planet ROS - http://planet.ros.org![]() http://planet.ros.org
http://planet.ros.org
ROS Discourse General: New tool: ros2sysmon - monitor nodes, topics, ifs, and more in one utility

This handy utility monitors key data from your ROS2 system. It brings together what exist individually in tools like ros2 topics, ros2 nodes, tf_utilities and more in one display. It’s fully terminal based so in your terminal emulator and even via ssh. It’s highly configurable via a json config file.
I hope you try it and post questions or issues in GitHub or here. I am interested in your installation experience, whether the numbers displayed are accurate, and also whether it itself is not a resource hog. Any other feedback of course is welcome as well.
Take a look here: GitHub - pitosalas/ros2sysmon
p.s. I know there must be something like this out there (in fact more than one) but I got tired of looking and it seemed like a fun little project. I hope someone tries it. And post issues if you want and I will look at them. It is open source (MIT).
6 posts - 2 participants
ROS Discourse General: ROS MCP Server Release!
Hi everyone!
We’re excited to announce the open-source release of the ROS MCP Server.
With this server, you can control existing ROS 1 & 2 robots using natural language with LLMs like Claude, GPT, and Gemini—no changes to the robot’s code required!
Key Features:
-
Connect any LLM to ROS robots via the Model Context Protocol (MCP)
-
Supports Linux, Windows, and macOS

-
Natural language → ROS topics, services, and actions (including custom messages!)
-
Works without modifying robot source code
![]() GitHub: https://github.com/robotmcp/ros-mcp-server
GitHub: https://github.com/robotmcp/ros-mcp-server
![]() Demo Videos:
Demo Videos:
-
Debugging an industrial robot: https://youtu.be/SrHzC5InJDA
-
Controlling Unitree Go2 with natural language: https://youtu.be/RW9_FgfxWzs
We’d love to hear your feedback or suggestions if you get a chance to try it out!

2 posts - 2 participants
ROS Discourse General: Fusion 360 to ROS 2 URDF – Updated & Improved!
Hello
Here is the improved Fusion 360 to URDF for ROS 2 project with new enhancements to make it even easier and more robust for your robotics workflows.
![]() What’s new in this release:
What’s new in this release:
![]() �������� ������������� – Clearer setup instructions and usage guidelines for developers at all levels.
�������� ������������� – Clearer setup instructions and usage guidelines for developers at all levels.
![]() ��� � Jazzy ������� – Generated ROS 2 URDF package supports ROS Jazzy distribution with new Gazebo Sim.
��� � Jazzy ������� – Generated ROS 2 URDF package supports ROS Jazzy distribution with new Gazebo Sim.
![]() ��� ����� – Stability improvements and resolved issues from previous versions.
��� ����� – Stability improvements and resolved issues from previous versions.
![]() ������ ��������� ������ – Choose between Gazebo Classic and Gazebo Sim with a simple option, streamlining your simulation setup.
������ ��������� ������ – Choose between Gazebo Classic and Gazebo Sim with a simple option, streamlining your simulation setup.
![]() �������� ��� ����� ����� �������
�������� ��� ����� ����� �������
Check out the repo and get started with better Fusion 360 to ROS 2 integration today!
Feel free to report issues, suggest enhancements, and contribute new features or bug fixes via pull requests (PRs).

Regards
Lentin Joseph
1 post - 1 participant
ROS Discourse General: AgileX PiPER: Teleoperation with Hand Gesture Recognition
Hi everyone,
we’d like to share a small project using the AgileX PiPER robotic arm combined with a depth camera to achieve simple teleoperation.
The core idea is to use hand gesture recognition to control the end effector position of PiPER (only Cartesian position, not orientation).
This is a lightweight, low-cost demo that may help inspire gesture-based human-robot interaction projects.
 Abstract
This repository implements a low-cost, simple teleoperation function using a depth camera (position control only).
Tags: Gesture Recognition, Coordinate Mapping, AgileX PiPER
Code Repository: AgileX-College GitHub
Function Demonstration:
Control a Robot Arm… With Just Your Hand?!
 Pre-use Preparation
Hardware
- Orbbec Petrel (aligned depth + RGB, 640×400@30fps)
- (Optional) Intel RealSense D435 (aligned depth + RGB, 640×480@30fps)
- AgileX Robotics PiPER robotic arm
Software Environment
- Install required ROS packages:
sudo apt install -y ros-noetic-sensor-msgs ros-noetic-image-transport ros-noetic-cv-bridge ros-noetic-vision-msgs ros-noetic-image-geometry ros-noetic-pcl-conversions ros-noetic-pcl-ros ros-noetic-message-filters
- Install gesture recognition library:
pip3 install mediapipe
- Clone & build:
cd your_ws/src
git clone https://github.com/agilexrobotics/AgileX-College.git
cd ..
catkin_make
source devel/setup.bash
 Operation Steps
1. Start the Robotic Arm
Follow the PiPER driver deployment:
Insert CAN module → find bus → activate:
./find_all_can_port.sh
./can_activate.sh
Launch driver:
roslaunch piper start_single_piper.launch
Start IK library (pinocchio):
python piper_pinocchio.py
Start camera (example: D435):
roslaunch realsense2_camera rs_aligned_depth.launch
Start gesture detection:
rosrun handpose_det handpose_det.py
2. Start Teleoperation
Define custom Home position (different from driver’s built-in Home):
self.endPosX = -0.344
self.endPosY = 0.0
self.endPosZ = 0.110
Publish to /pos_cmd:
rostopic pub /pos_cmd piper_msgs/PosCmd "{
x: -0.344, y: 0.0, z: 0.110,
roll: 0.0, pitch: 0.0, yaw: 0.0,
gripper: 0.0, mode1: 1, mode2: 0
}"
Run detection:
rosrun handpose_det handpose_det.py
RViz shows:
- Red dots = finger points
- Green dots = palm center

3. Define Teleoperation Base Frame
- Gesture
OPEN_HAND→ change toFIST→ hold for 3s - Publishes
/base_frame_originpose - Maps hand’s relative motion to PiPER motion


 Full Code
#!/usr/bin/env python3
# _*_ coding:utf-8 _*_

import rospy
import cv2
import mediapipe as mp
import numpy as np
from sensor_msgs.msg import Image
from cv_bridge import CvBridge
from visualization_msgs.msg import MarkerArray, Marker
from geometry_msgs.msg import PoseStamped
from piper_msgs.msg import PosCmd

class HandPoseTeleop:
    def __init__(self):
        rospy.init_node('handpose_teleop', anonymous=True)
        self.bridge = CvBridge()
        self.image_sub = rospy.Subscriber("/camera/color/image_raw", Image, self.image_callback)
        self.marker_pub = rospy.Publisher("/hand_markers", MarkerArray, queue_size=1)
        self.base_pub = rospy.Publisher("/base_frame_origin", PoseStamped, queue_size=1)
        self.cmd_pub = rospy.Publisher("/pos_cmd", PosCmd, queue_size=1)

        # Custom home point
        self.endPosX = -0.344
        self.endPosY = 0.0
        self.endPosZ = 0.110

        # Mediapipe
        self.mp_hands = mp.solutions.hands
        self.hands = self.mp_hands.Hands(min_detection_confidence=0.7,
                                         min_tracking_confidence=0.5)
        self.mp_draw = mp.solutions.drawing_utils

        rospy.loginfo("HandPoseTeleop initialized.")

    def image_callback(self, msg):
        cv_image = self.bridge.imgmsg_to_cv2(msg, "bgr8")
        img_rgb = cv2.cvtColor(cv_image, cv2.COLOR_BGR2RGB)
        results = self.hands.process(img_rgb)

        marker_array = MarkerArray()
        if results.multi_hand_landmarks:
            for hand_landmarks in results.multi_hand_landmarks:
                # Publish markers
                for i, lm in enumerate(hand_landmarks.landmark):
                    marker = Marker()
                    marker.header.frame_id = "camera_link"
                    marker.type = Marker.SPHERE
                    marker.action = Marker.ADD
                    marker.scale.x = marker.scale.y = marker.scale.z = 0.01
                    marker.color.a = 1.0
                    marker.color.r = 1.0
                    marker.pose.position.x = lm.x
                    marker.pose.position.y = lm.y
                    marker.pose.position.z = lm.z
                    marker_array.markers.append(marker)

                # Compute palm center (average of landmarks)
                palm_center = np.mean([[lm.x, lm.y, lm.z] for lm in hand_landmarks.landmark], axis=0)
                marker = Marker()
                marker.header.frame_id = "camera_link"
                marker.type = Marker.SPHERE
                marker.action = Marker.ADD
                marker.scale.x = marker.scale.y = marker.scale.z = 0.02
                marker.color.a = 1.0
                marker.color.g = 1.0
                marker.pose.position.x = palm_center[0]
                marker.pose.position.y = palm_center[1]
                marker.pose.position.z = palm_center[2]
                marker_array.markers.append(marker)

                # Send position command
                pos_cmd = PosCmd()
                pos_cmd.x = self.endPosX + palm_center[0]
                pos_cmd.y = self.endPosY + palm_center[1]
                pos_cmd.z = self.endPosZ + palm_center[2]
                pos_cmd.roll = 0.0
                pos_cmd.pitch = 0.0
                pos_cmd.yaw = 0.0
                pos_cmd.gripper = 0.0
                pos_cmd.mode1 = 1
                pos_cmd.mode2 = 0
                self.cmd_pub.publish(pos_cmd)

        self.marker_pub.publish(marker_array)

if __name__ == '__main__':
    try:
        teleop = HandPoseTeleop()
        rospy.spin()
    except rospy.ROSInterruptException:
        pass
Summary
This demo shows how the AgileX PiPER robotic arm can be controlled via hand gesture recognition and a depth camera, achieving real-time position teleoperation.
We’d love to hear your feedback! ![]()
- How would you extend this (e.g. orientation, multi-modal input)?
- Anyone interested in integrating this with VR/AR or haptics?
![]() Full repo & details: AgileX-College on GitHub
Full repo & details: AgileX-College on GitHub
AgileX Robotics
![]() https://global.agilex.ai/
https://global.agilex.ai/
2 posts - 2 participants
ROS Discourse General: How many DDS participants are currently used/allowed by RMW?
We’ve currently been running into some issues that look like reaching the maximum number of DDS entities (i.e. nodes are started without error, but do not appear in ros2 node list, neither do their topics appear). If we shut down a few other nodes, than the same node runs well.
Overflowing into other domains should not be an issue according to The ROS_DOMAIN_ID — ROS 2 Documentation: Galactic documentation (we don’t use any other domains than 0). We don’t yet have 120 nodes, but I guess we’ll get there.
However, with the changes from Switch to one participant per context by ivanpauno · Pull Request #189 · ros2/rmw · GitHub , I got a bit confused about the number of participants created and needed by ROS 2.
Now it should be the case that there is 1 DDS participant per Context. However, the explanation of what Context currently is is a bit vague.
Is it the case that the simple single-node process creates exactly 1 participant?
How is it with component container? Does it have 1 participant for the whole container, or does it have one per loaded component?
How is it with the weird transform_listener_impl_* nodes automatically created by TransformListener? Do they “eat” a participant?
And last - I guess the 120 participant limit is per PC, right? This isn’t directly mentioned in the design doc, but I think it follows from the design…
To resolve our current problem, I’ll try switching to discovery server, but I’d like to have a clear view on the other mentioned questions.
Thanks for ideas!
3 posts - 3 participants
ROS Discourse General: :bird: ROSCon 2025 Birds of Feather Sessions Now Open!
 ROSCon 2025 Birds of Feather Sessions Now Open!

Hi Everyone,
Want to host a Birds of a Feather (BoF) session at ROSCon? We just posted the sign up form for BoF sessions at ROSCon. This year ROSCon will have eight dedicated BoF slots available on the workshop day, October 27th. Submissions will be reviewed as they come in, and the form will close once all eight slots are filled, so don’t delay proposing a session.
Sign up here for an official BoF slot!
You are also more than welcome to propose a BoF at another time / location as long as it doesn’t interfere with the main ROSCon program. We suggest using the Whova app onsite to organize your BoF session. A winning strategy is to organize a BoF dinner / meetup after the main program.
Full details are up on the ROSCon 2025 website.
2 posts - 1 participant
ROS Discourse General: Bridging the Gap: Model-Driven Development and ROS
Model-driven development (MDD) has long proven its value in software engineering, but they have struggled to gain traction in robotics. Why? Because we already have ROS and ROS 2. Their development methodology - centered on writing code by hand - doesn’t align well with traditional MDD. For years, ROS became the de facto standard thanks to its advantages and strong community, so there was little motivation to “reinvent the wheel” with new approaches.
But robotics has changed. Nowadays, robotic systems are increasingly complex and modular, which is why MDD can provide significant benefits.
As someone who strongly believes in the ROS ecosystem, I’ve been exploring ways to bridge the gap between ROS and MDD. My approach allows developers to keep building components in the usual way while using introspection and static code analysis to automatically transform those components into models. These models can then be composed at the system level, validated, and used to generate ROS deployment artifacts. In other words, let the programmer focus on the complex logic, while automating the generation of package.xml, CMakeLists, launch files, documentation, and similar artifacts.
I’ve also conducted an evaluation study to show when this approach is most useful and what concrete benefits it brings.
This study was recently published, and it is available online at https://journals.sagepub.com/doi/pdf/10.1177/17298806251363648
From all the data collected, you can see these two graphs showing the reduction in development time as the complexity of the system increases, and how the number of lines of code written is reduced, and more importantly, the files (and languages) to be implemented.


The most relevant positive outcomes os this study are:
- MDD reduces testing time and error correction effort.
- Once learned and supported by a model base, development time is significantly reduced.
- Code generation reduces manual coding and lowers the risk of errors.
- Developers only need to learn one modeling language instead of multiple programming languages.
- MDD improves portability, which is especially beneficial for modular robots and serial production.
The following repository collects all the files and data: GitHub - ipa-nhg/MDD_Evaluation_Study.github.io: This repository collects data from the study carried out to evaluation the use of MDD techniques over ROS
I hope this information is useful. If you would like to collaborate on this line of research or get more information about what I have done, please do not hesitate to contact me.
![]() https://www.linkedin.com/in/nadiahg/
https://www.linkedin.com/in/nadiahg/
1 post - 1 participant
ROS Discourse General: Is there a way to identify which network card the ros2 program data goes through (network port or WIFI)?
Is there a way to identify which network card the ros2 program data goes through (network port or WIFI)?
7 posts - 3 participants
ROS Discourse General: No Meeting 2025-09-08 (Cloud Robotics Working Group)
The group will not be holding its regular meeting this coming Monday 8th September 2025. Meetings will resume as normal from the 22nd September.
Last meeting, the CRWG discussed the similarities and differences between the tech of the companies that had come to talk about Logging & Observability. The group agreed that we need to talk to consumers of these technologies, so effort will be made to contact some of the companies with large fleets to request they talk to us. If you’d like to see the meeting, the recording is available on YouTube.
1 post - 1 participant
ROS Discourse General: ROS 2 Rust Meeting: September 2025
The next ROS 2 Rust Meeting will be Mon, Sep 8, 2025 2:00 PM UTC
The meeting room will be at https://meet.google.com/rxr-pvcv-hmu
In the unlikely event that the room needs to change, we will update this thread with the new info!
2 posts - 2 participants
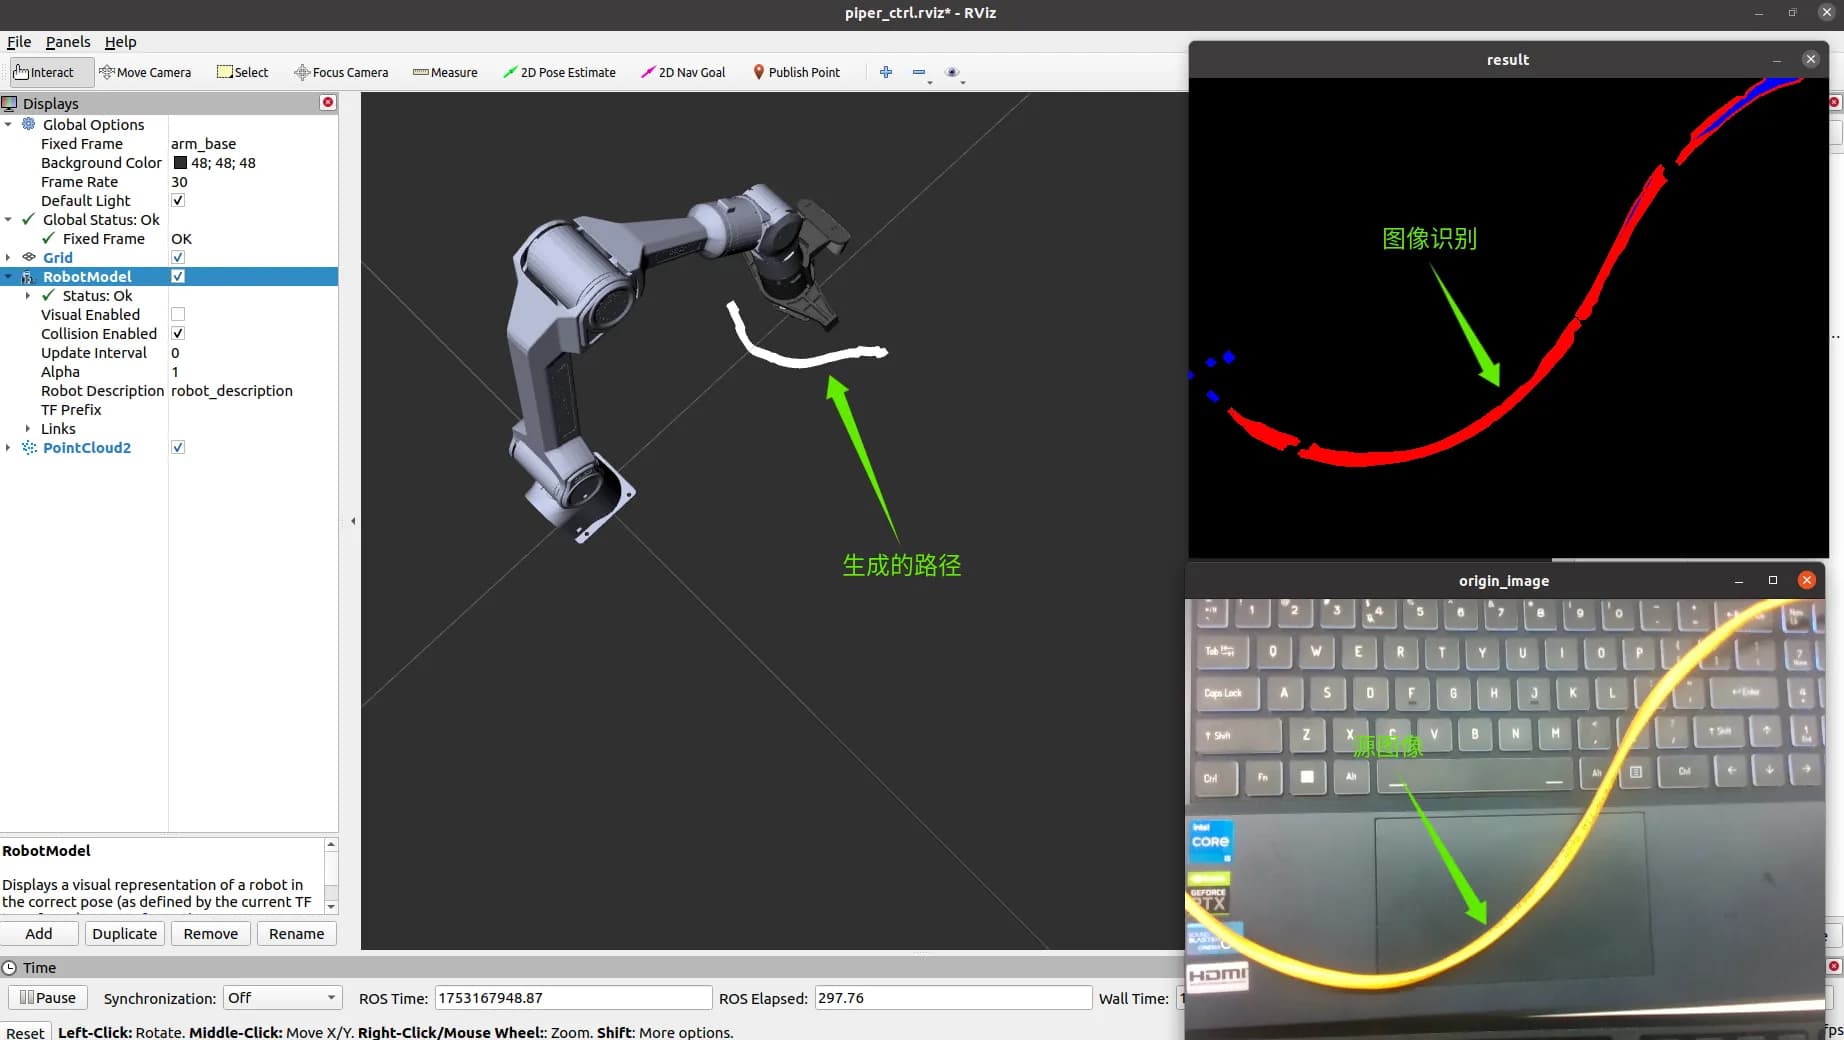
ROS Discourse General: Curve and Cube Recognition with AgileX PIPER Robotic Arm
Hi everyone,
We’d like to share a simple program we developed for color block recognition and 3D curve extraction using the AgileX PIPER robotic arm. The project leverages OpenCV with depth and color data from a depth camera, enabling 3D coordinate extraction of color targets that can be applied to basic robotic grasping and trajectory tracking tasks.
We hope this example can serve as a starting point for anyone exploring computer vision–based manipulation with lightweight robotic arms. Feedback, improvements, and pull requests are always welcome!
Abstract
A simple program for color block recognition and 3D coordinate extraction, utilizing the OpenCV library. It performs recognition using depth information and color data from a depth camera, and the extracted 3D coordinates of color blocks can be applied to simple robotic arm grasping tasks.
Keywords: Color Recognition, 3D Curve Extraction, Curve Fitting, Curve Interpolation, AgileX PIPER
Code Repository
GitHub link: AgileX-College/piper/cubeAndLineDet
Function Demonstration
Teaching a Robot Arm to Spot Colors & Draw Curves
Preparation Before Use
Hardware Preparation
- Orbbec Petrel (with aligned depth images and RGB images: 640×400@30fps)
- (Optional) Intel RealSense D435 (with aligned depth images and RGB images: 640×480@30fps)
- AgileX PIPER Robotic Arm
Software Environment Configuration
- Compile and install the PCL point cloud library. For Linux compilation examples, refer to the official documentation. The
on_nurbsoption needs to be specified during compilation. - For PIPER manipulator driver deployment, refer to: piper_sdk
- For PIPER manipulator ROS control node deployment, refer to: piper_ros
Functional Operation Steps
1. Start the Color Block Detection Node
- Start the depth camera ROS driver node (example: Orbbec Petrel):
roslaunch astra_camera dabai_dc1.launch
- Start the color block detection node. Two image windows will pop up:
hsv_imageandorigin_image. Adjust HSV parameters inhsv_imageto find specific colors, or click inorigin_imageto extract the target color automatically:
rosrun cube_det cube_det

-
Example of automatic color search:

-
The 3D coordinate information of the detected point will be visualized in rviz:


2. Start the Curve Detection
- Start the depth camera driver:
roslaunch astra_camera dabai_dc1.launch
- Start the curve detection node. It uses a built-in curve fitter and interpolator to make the output curve continuous and smooth:
rosrun cube_det line_det
-
Click the target curve in
origin_imageto extract and search automatically. -
Open rviz to view the converted point cloud curve:

-
Start the manipulator’s ROS control node:

# Find the robotic arm CAN port
./find_all_can_port.sh
# Connect to the CAN port
./can_activate.sh
- Start the manipulator motion node:
roslaunch piper start_single_piper.launch
- Start inverse kinematics. Reference: piper_ros Pinocchio README
python piper_pinocchio.py
- Set a manipulator home position:
rostopic pub /pos_cmd piper_msgs/PosCmd "{
x: -0.344,
y: 0.0,
z: 0.110,
roll: 0.0,
pitch: 0.0,
yaw: 0.0,
gripper: 0.0,
mode1: 1,
mode2: 0
}"
-
Visualize the generated end-effector control path
/line_pathin rviz:


-
Start the manipulator motion path loading and end-effector control program:

rosrun cube_det path_confer.py
path_confer.py supports three operations:
r: Record the current frame point cloud, transform toarm_basecoordinates, and generate a path.s: Send the recorded path point by point.p: Publish the entire path cyclically.
-
After recording (
r), the transformed path/transformed_cloudwill be shown in rviz:

-
Press
sorpto control the manipulator to follow the generated trajectory.

Conclusion
This project demonstrates how the AgileX PIPER robotic arm can be combined with depth cameras and OpenCV to achieve:
- Color-based object detection
- 3D coordinate extraction
- Curve fitting and interpolation
- Trajectory execution with inverse kinematics
All source code and setup instructions are available in the GitHub repository.
If you try this out or extend the functions, we’d love to hear your feedback and results. Please feel free to share your experiences or raise issues in the repo.
Thanks for reading, and happy coding! ![]()
1 post - 1 participant
ROS Discourse General: Introduction to ROS YouTube Video Series
Hi everyone! I’d like to let you know that I dove into ROS earlier this year and have been working on a “Getting Started” video series for DigiKey’s YouTube channel. There will be 12 videos, and they should be released weekly on DigiKey’s channel. I start off with basic communication between nodes (as you do) before diving into parameters, launch files, and some TF2. I mention talking to microcontrollers at the end, but I don’t get into micro-ROS (as I feel that should probably be its own series). I welcome feedback and suggestions for future videos!
The first video is here:
Introduction to ROS Part 1: What is the Robot Operating System? | DigiKey
2 posts - 2 participants
ROS Discourse General: How to connect TurtleBot3 to Windows (WSL2)
I’m setting up a lab environment for my students and have replaced the Raspberry Pi 4 on the TurtleBot3 with a Raspberry Pi 5, so all logic now runs directly on the robot.
The challenge: most of my students use Windows PCs. I’d like to use WSL2 and a Docker container to connect to the TurtleBot3 via USB or over a Wi-Fi access point. However, I haven’t been able to get communication working between the TurtleBot3 and WSL2.
Is this even possible? Has anyone managed to get this setup running? I’d appreciate any guidance or tips.
2 posts - 2 participants
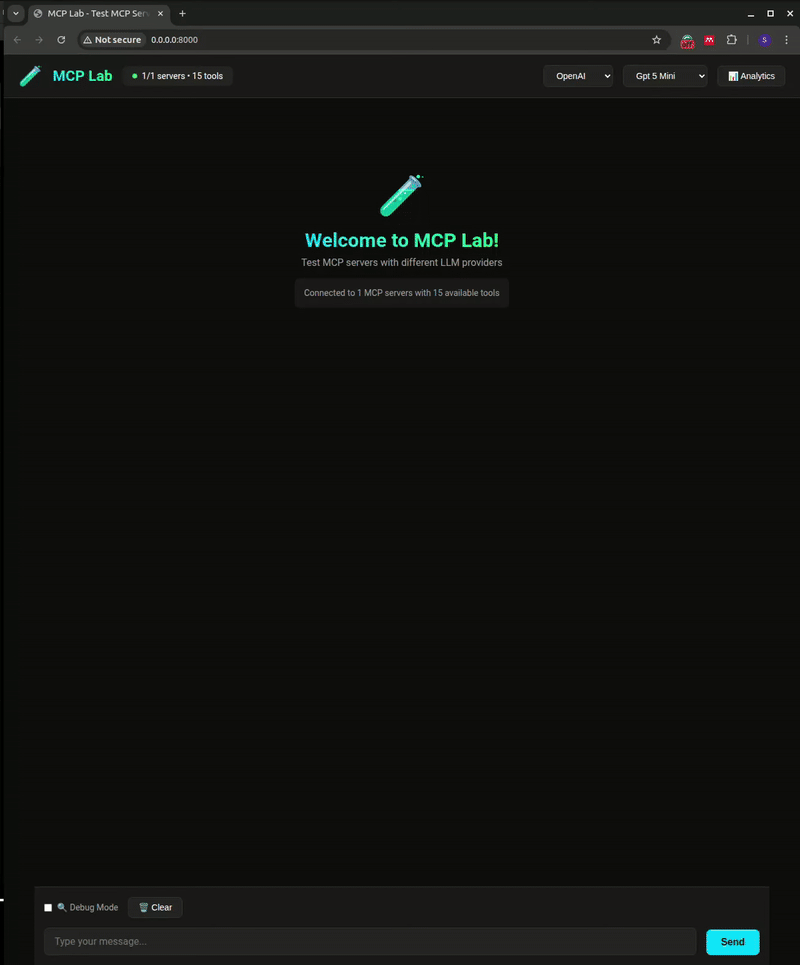
ROS Discourse General: Another MCP Server to analyze your rosbags with LLMs + a UI to benchmark it against different LLM providers
Hi!
We are releasing yet another MCP server for rosbags, and an MCP Lab UI so that you can see which LLMs (closed or open) are able to properly use the available tools.
Quick demos
With Claude Desktop

With MCP Lab running locally


rosbags-mcp
The rosbags-mcp server allows LLMs to pull data from your rosbags and plot it in interactive plots with plotly. It is a pure Python package with no ROS dependencies (based on the rosbags library).
Some of the features include:
-
listing bags in a directory, and getting their info
-
searching messages (based on conditions)
-
filtering bags
We also believe that there is value in creating domain-specific tools that are useful across ROS robots. We started with basic functionality:
-
trajectory analysis (e.g., with spatial subsampling)
-
laserscan data analysis
-
logs from /rosout
-
tf tree
We also decided to add a few tools to visualize data (even though we’d love to have foxglove integration, for example!)
-
time series data plots
-
2D plots
-
laserscan polar plots
Finally, you can also return an image with an LLM (if you are using a multi-modal model).
All this is not entirely new. For example, Bagel is an amazing tool that has been posted already here (release), here (update), and here (DuckDB update). However, we started working on this before we became aware of Bagel and thought it might have a place out there! We are working on other ROS-related MCP servers and hope to release more soon. We see a lot of potential, for example, in the DuckDB integration from Bagel.
MCP Lab Web UI
Together with the rosbags MCP server, we are releasing MCP-Lab, a Web UI where you can choose OpenAI, Anthropic, or open-source models provided by Groq (for now), to test their ability to call tools in any MCP server.
You can also run MCP Lab on your robot and access it remotely.

Benchmarking
We will release a short technical paper. In the meantime, here’s a preview of selected queries and whether different LLMs are able to use the MCP server properly or not:

Any feedback is welcome!
The MCP server and MCP Lab are both projects under active development so not everything will be working perfectly.
Contributors: @sahars93, @sisqui, @jopequ
1 post - 1 participant
ROS Discourse General: Is it time to discuss rosidl?
TL; DR I am of the opinion that some of the performance bottlenecks we still see in ROS 2 can be traced back to rosidl design. There are benefits to language-specific runtime representations and vendor-specific serialization formats, but efficiency is not one of them. Other designs may be better suited to the kind of data streams that are common in robotics. In that sense, GitHub - Ekumen-OS/flatros2 may be an interesting conversation starter.
Howdy! I don’t post often on ROS Discourse but I thought this may be worthwhile. The Physical AI rebranding of robotics is drawing attention and resources, and in that whirlwind I keep seeing new libraries and frameworks showcasing performance figures that seemingly obliterate those
of ROS 2 (like dora-rs/dora-benchmark, but there are others). Why? The total amount of engineering resources invested by this community in ROS 2 far exceeds that of any other new project and yet I still find myself second guessing ros2 topic hz output. Well, I’ve been around and about for a good while now, and I have a hypothesis.
rosidl is one the oldest corners of ROS 2. C and C++ message generators were first released with Alpha 1, each with their own runtime representations: simple enough, language-specific. The first few DDS based middlewares (like opensplice) had their own vendor-specific IDL to comply with, for interoperability and full feature support, and so type support code and internal runtime representations had to be generated. A decade later ROS 2 is still bound by this design.
Zero-copy transports cannot cross the language boundary because there’s no common runtime representation, and because in-memory layouts are nonlocal, even for the same language their scope of application is extremely narrow (so narrow not even standard messages qualify). Middlewares (de)serialize messages to vendor-specific formats that keep them traceable on their domain and afford us features like keyed topics, whether that makes sense for a given form of data or not. Repeated (de)serialization of images and pointclouds (and other forms of multi-dimensional data) certainly does not help speed.
I honestly didn’t know if there was a way out of this. Some of these shortcomings cannot be fixed out of tree. So I started Ekumen-OS/flatros2 with some Ekumen colleagues as an experiment. It turns out there are lots of pitfalls and limitations but there is a way. Ekumen-OS/flatros2 is NOT it, however. A true solution (I believe) must be a core solution, and Ekumen-OS/flatros2 is just an exercise on how that future solution may look like i.e. messages as language-specific views to contiguous memory layouts, bounded on write, unbounded on read. The choice of flatbuffers and iceoryx2 was informed but arbitrary. Both have interesting properties nonetheless.
Hope this helps kickstart a discussion. There’s no fundamental reason why ROS 2 cannot perform near I/O limits. And who knows, maybe there’s enough momentum to sort out message compabitility too while we are at it (and I’d very much appreciate backwards and forward compatible bags).
12 posts - 6 participants
ROS Discourse General: Announcing Fast DDS Pro – Advanced Features for ROS 2 and Vulcanexus
Hello ROS 2 community,
We are excited to announce the upcoming release of Fast DDS Pro, the new commercial edition of Fast DDS.
Fast DDS Pro extends the capabilities of the community edition with advanced networking features designed for industrial and defense-grade deployments. These features can be used directly from ROS 2, or through Vulcanexus, our all-in-one ROS 2 toolset.
![]() Key features at launch:
Key features at launch:
-
Low Bandwidth Plugins – Optimized DDS communication for constrained or unstable links (e.g., radio, satellite, IoT).
-
TSN Support – Deterministic communication with guaranteed latencies.
-
IP Mobility – Seamless connectivity across changing networks (vehicles, mobile robots).
-
Congestion Control (coming soon) – Adaptive traffic management under heavy network load.
![]() Release planned for September 2025.
Release planned for September 2025.
![]() Learn more and sign up for updates here.
Learn more and sign up for updates here.
We believe this new edition will provide the ROS 2 community with tools to tackle more demanding networking challenges in production systems, while continuing to support the community with the open-source Fast DDS.
We’d love to hear your feedback and discuss use cases where these features could bring value to your projects.
3 posts - 2 participants
ROS Discourse General: Join Us for the Next Virtual ROS Meetup in Nigeria (September 13)! 🇳🇬
Hello ROS Developers,
We’re excited to announce that we’ll be hosting another Virtual ROS Meetup in Nigeria!
Whether you’re just starting and want to learn how to set up a ROS 2 development environment without changing your PC’s OS, or you’re an enthusiast or expert eager to dive deeper into advanced topics like Kalman filters for robot localization, this session is for you.
We’ll be joined by two amazing speakers, who are contributors to the great Nav2 project with extensive experience in using and applying ROS2:
Sakshay Mahna will demonstrate how to quickly set up a ROS 2 development environment using the ros2env VS Code Extension, which he developed ![]() .
.
Stevedan Ogochukwu Omodolor will guide us through the application of Kalman filters to fuse multiple sensors for improved robot localization ![]() .
.
Kindly Register here: Robot Operating System (ROS) Meetup, Lagos
We look forward to seeing you there!
Venue: Virtual only
Date: Sat, Sep 13, 2025 11:00 AM UTC→Sat, Sep 13, 2025 1:00 PM UTC
Contact Email Address: rosnaija.ng@gmail.com

1 post - 1 participant
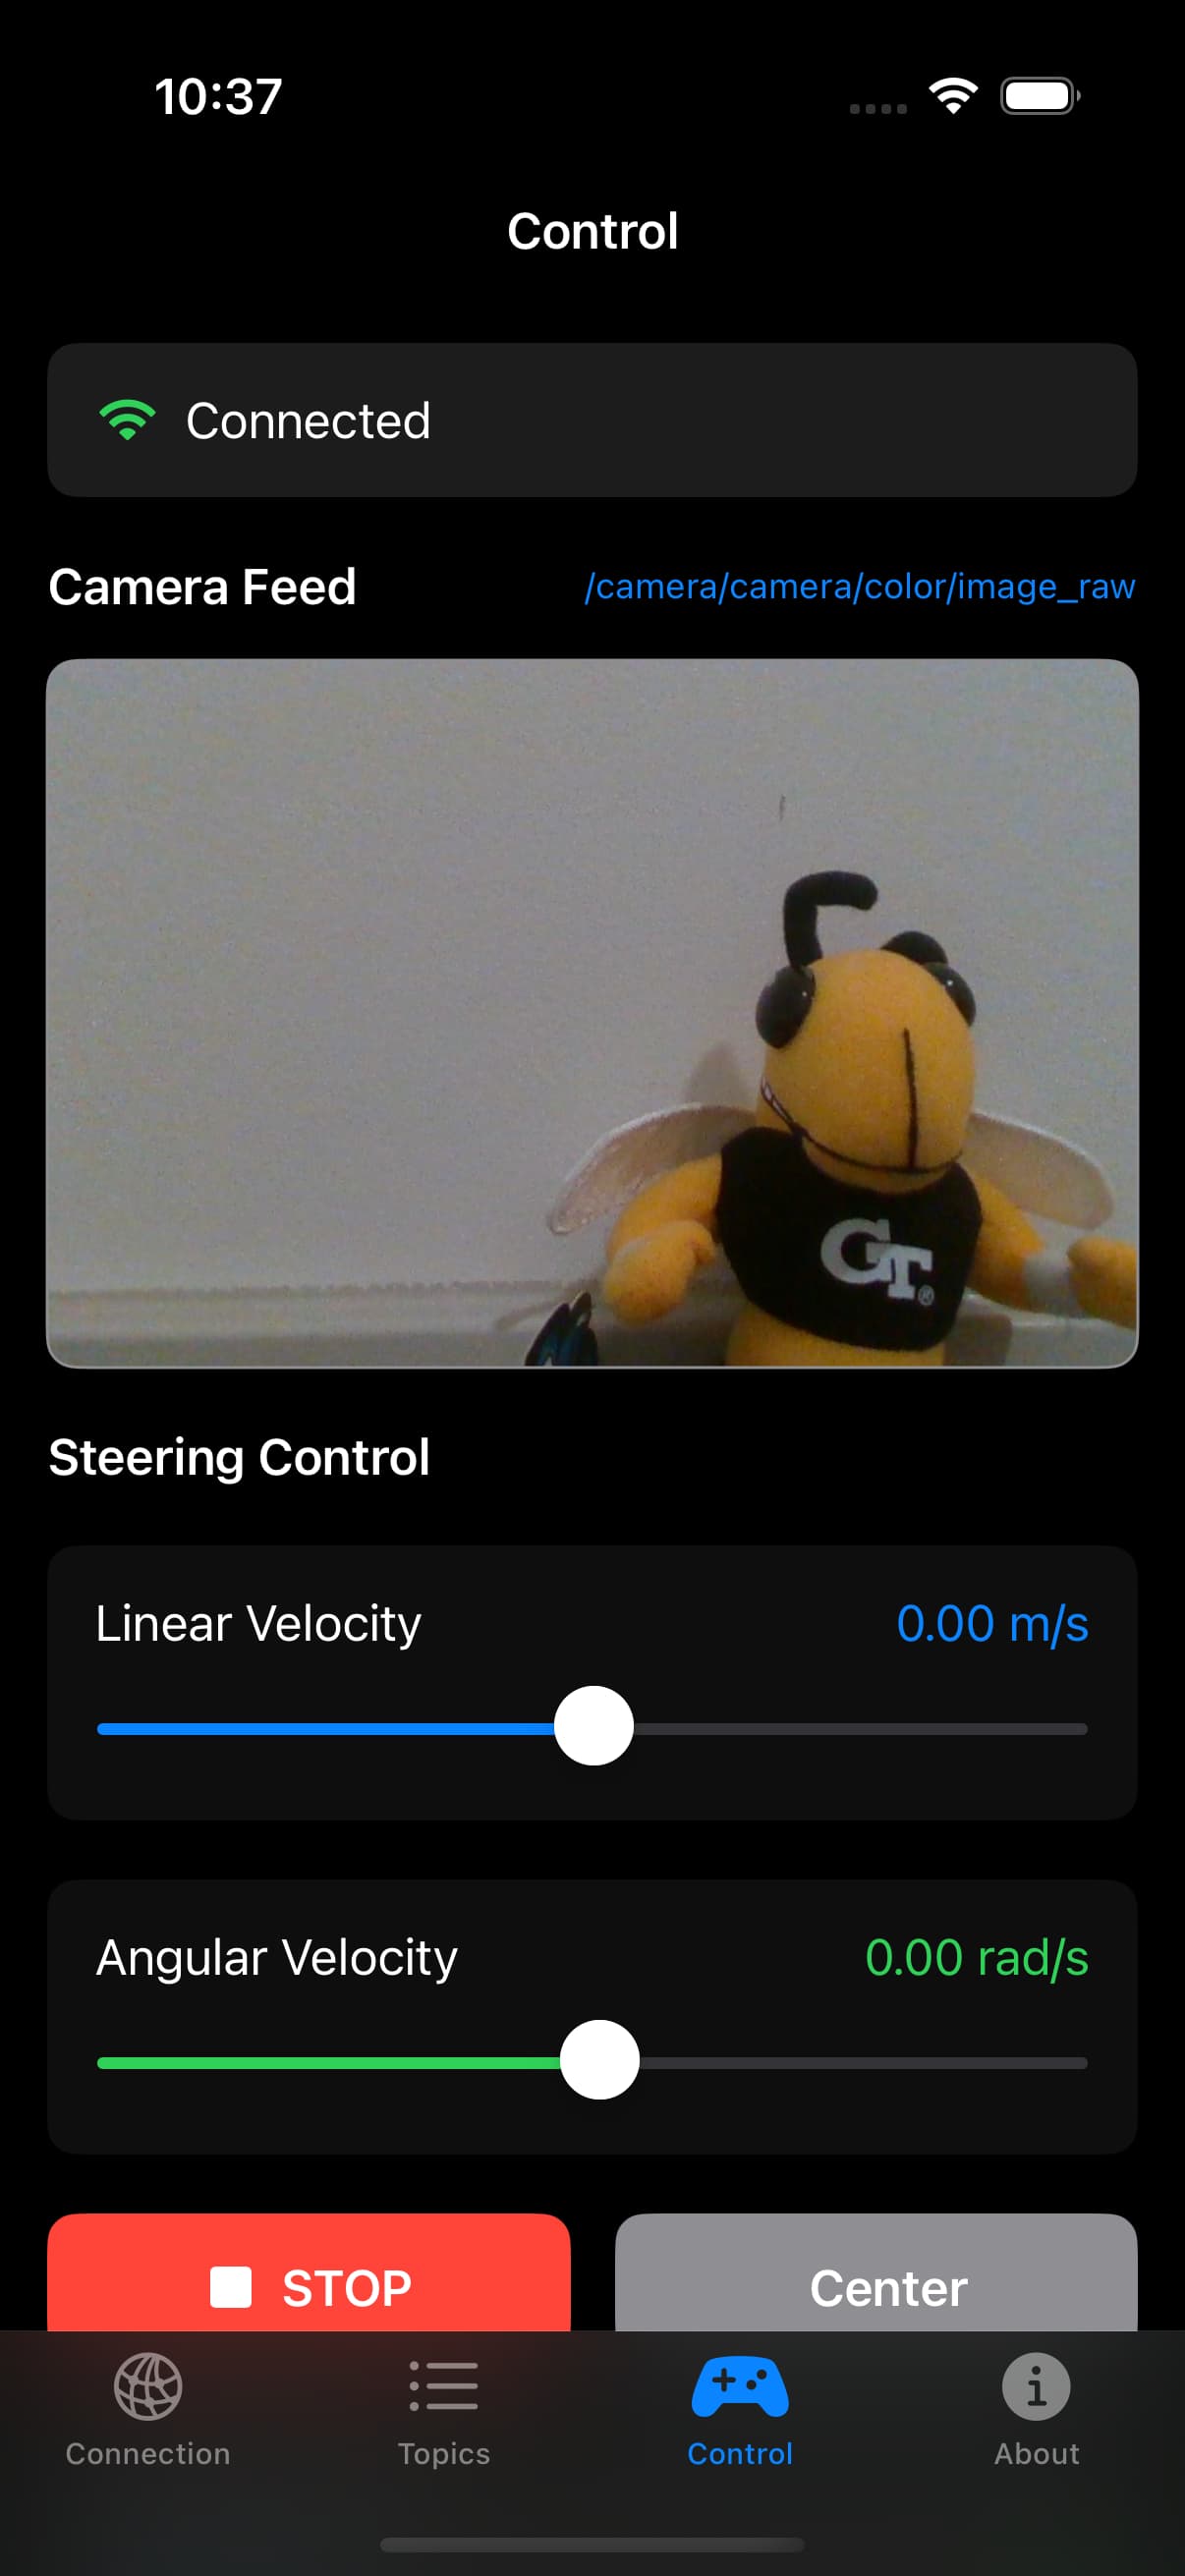
ROS Discourse General: Robot Steering & video steaming on new iOS App (Robot Steering)
I launched a new iOS app, “Robot Steering,” using the web_video_server & rosbridge_suite libraries.
Please download this free app to control your robot with video streaming features.

2 posts - 2 participants
ROS Discourse General: RobotCAD integrated Dynamic World Generator
Added “Create custom world” tool based on Dynamic World Generator repo. It let you create Gazebo world with static and dynamic obstacles directly in RobotCAD.
RobotCAD - Dynamic world creating — Video | VK - video demo

1 post - 1 participant
ROS Discourse General: ManyMove integration with Isaac SIM 5.0
ManyMove, an open-source framework built on ROS 2, MoveIt 2, and BehaviorTree.CPP, is now enabled to interact with NVIDIA Isaac Sim 5.0.
With this integration, you can:
![]() Execute behavior-tree–based motion control directly to physics simulation.
Execute behavior-tree–based motion control directly to physics simulation.
![]() Prototype and validate manipulation tasks like pick-and-place in a high-fidelity digital twin.
Prototype and validate manipulation tasks like pick-and-place in a high-fidelity digital twin.
![]() Streamline the path from simulation to real-world deployment.
Streamline the path from simulation to real-world deployment.
ManyMove is designed for industrial applications and offers a wide range of examples with single or double robot configuration.
Its command structure is similar to industrial robot languages, easing the transition from classic robotics frameworks to ROS 2.
Behavior Trees power the logic cycles for flexibility and clarity.
![]() Demos:
Demos:

Combining ManyMove, Isaac Sim’s physics and rendering and Isaac ROS reference workflows aims to allow easier deployment of GPU-accelerated packages for perception-driven manipulation.
![]() How to run the examples
How to run the examples
-
Install & source the Humble or Jazzy version of ManyMove by following the instructions in the GitHub README.
-
Install Isaac Sim 5.0 and enable the ROS2 Simulation Control extension.
-
Launch the example:
ros2 launch manymove_bringup lite_isaac_sim_movegroup_fake_cpp_trees.launch.py -
Load
.../manymove/manymove_planner/config/cuMotion/example_scene_lite6_grf_ros2.usdand start the simulation. -
Press START on ManyMove’s HMI
Tested on Ubuntu 22.04 with ROS 2 Humble and on Ubuntu 24.04 with ROS2 Jazzy.
Feedback welcome!
1 post - 1 participant
ROS Discourse General: Anyone here going to SWITCH 2025 after ROSCon 2025?
Hey everyone!
I noticed that SWITCH Conference is happening the same week as ROSCon in Singapur. It is a major deep‑tech innovation and startup event that brings together founders, investors, corporates, and researchers focused on research commercialization…
I’d love to know if anyone in the ROS community has been there before, and if so, would you recommend me going (as an robotics enthusiasts or entrepreneurs wannabe)?
Also, is anyone here planning to attend this year?
Thanks in advance for any thoughts or advice! ![]()
1 post - 1 participant
ROS Discourse General: Guidance Nav2 for similar project: straight lines trajectory
Hi there,
I am currently working on a project which has similarities to something showcased on the Nav2 website landing page. I would be after recommendations of global planner and local planner/controller plugins to execute a trajectory made of parallel passes spaced by a given constant offset distance. It is similar to what is visible below (visible on Nav2) website:

I was not sure in the example above which type of localization method was employed (GPS based for outdoor application, as it seem close to an agricultural outdoor application?). Unsure also who or which company would be behind (I could have given them credit for the illustration above), so would be thankful if the community would know who or which company is behind this illustration.
On my case, at the end of each straight pass (in blue), the robot could reposition via a curved trajectory or pause and execute two turns in place for the repositioning pass. I do not need to maintain speed during the turns.
So far I have explored the straight line global planner plugin as shown in the Nav2 example and trialed the Regulated Pure Pursuit and Vector Pursuit as local planner / controller. Is there other local planner I should consider for this type of application (straight line then repositioning to next straight line)? The goal is to be able to maintain a precise trajectory for the straight passes while going on an acceleration, cruise, deceleration speed profile on the straight lines. I am currently trialing those in Gazebo simulating the environment where the robot will be deployed. I am able to generate the required waypoints via the simple commander API and using AMCL for now as my application is indoor.
Using Gazebo and AMCL, here are the kind of things I obtain via PlotJuggler:

First of, there are differences between ACML and groundtruth, so AMCL would require some improvements, but I can see the AMCL goes by each corner which are waypoints, so the robot from its perception goes to all waypoints. Second the trajectory followed (groundtruth) is within +/-10cm of the target. Not sure if other or better tuned controller can improve the order of magnitude of the accuracy, I would be aiming to about +/-1cm at 1m/s. This is a combination of localization + control method. Open to discuss if I need to improve localization first (AMCL or other, such as Visual + IMU odometry, UWB, …). I am also using Humble which does not have the python API driveOnHeading, to trial a pure straight line command (maybe similar to broadcasting in /cmd_vel a positive x component).
Thank you very much for your help and guidance,
Nicolas
PS: first post on my side, so apologies if this is the wrong platform, I was trying to find out about a specific Nav2 platform but could not join the Nav2 slack.
2 posts - 2 participants
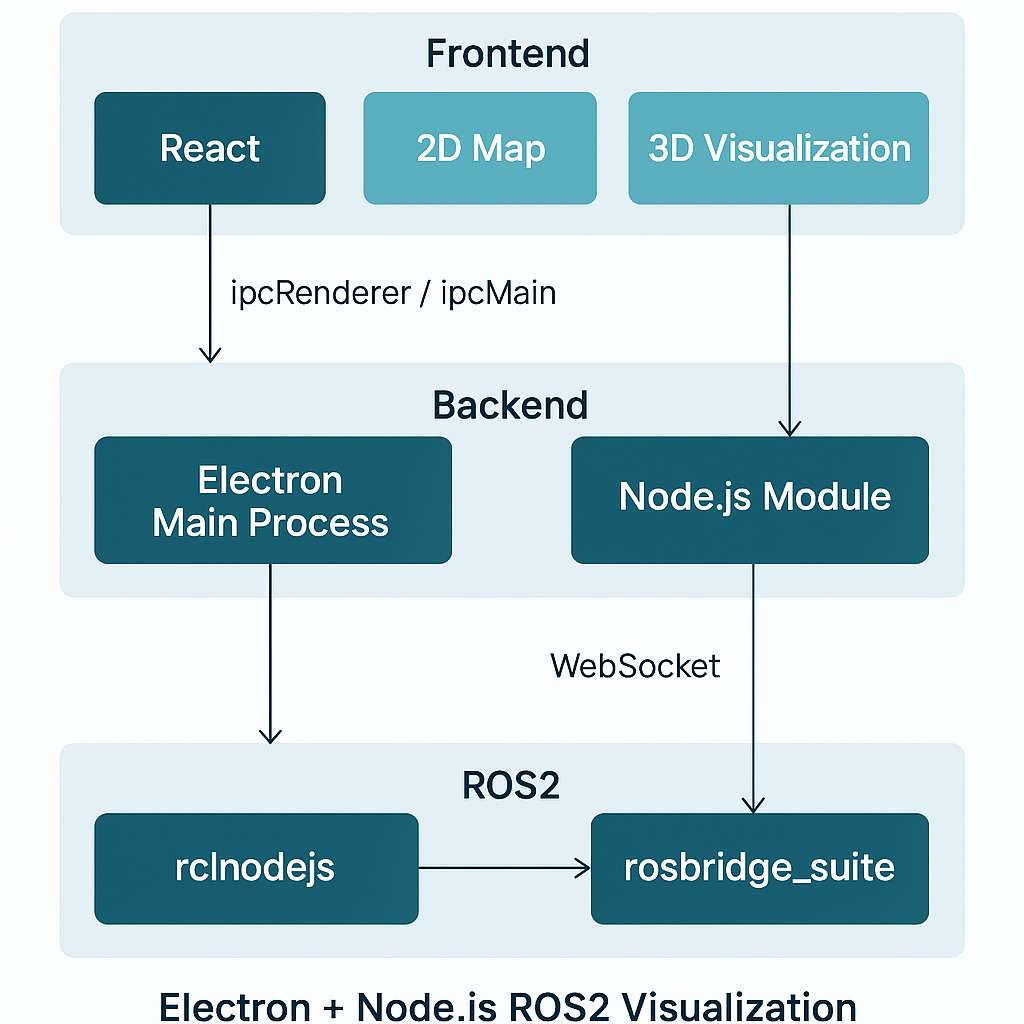
ROS Discourse General: ROS 2 Desktop Apps with rclnodejs + Electron
Looking for an alternative to traditional ROS visualization tools? Want to create custom robotics interfaces that are modern, interactive, and cross-platform?
The rclnodejs + Electron combination offers a powerful solution for building ROS 2 desktop applications using familiar web technologies, giving you the flexibility to create exactly the interface your project needs.
Why Use This?
-
Cross-platform - Windows, macOS, Linux
-
Modern UI - HTML5, CSS3, Three.js, WebGL
-
Easy deployment - Standalone desktop apps
Architecture
Example: Turtle TF2 Demo
Real-time TF2 coordinate frame visualization with interactive 3D graphics:

Perfect for: Robot dashboards, monitoring tools, educational apps, research prototypes.
Learn more: https://github.com/RobotWebTools/rclnodejs
1 post - 1 participant
ROS Discourse General: Think Outside the Box: Controlling a Robotic Arm with a Mobile Phone Gyroscope
![]() Hi ROS Community,
Hi ROS Community,
We’d like to share an experimental project where we explored controlling a robotic arm using the gyroscope and IMU sensors of a mobile phone. By streaming the phone’s sensor data via WebSocket, performing attitude estimation with an EKF, and mapping the results to the robotic arm, we managed to achieve intuitive motion control without the need for traditional joysticks or external controllers.
This post documents the setup process, environment configuration, and code usage so you can try it out yourself or adapt it to your own robotic applications. ![]()
Abstract
This project implements robotic arm control using mobile phone sensor data (accelerometer, IMU, magnetometer).
The data is transmitted from the mobile phone to a local Python script in real time via WebSocket.
After attitude calculation, the script controls the movement of the robotic arm.
Tags
Mobile Phone Sensor, Attitude Remote Control, IMU, Attitude Calculation, EKF
Code Repository
GitHub: Agilex-College/piper/mobilePhoneCtl
Function Demonstration
Environment Configuration
- Operating System: Ubuntu 18.04+ (recommended)
- Python Environment: Python 3.6+
- Clone the project:
git clone https://github.com/agilexrobotics/Agilex-College.git
cd Agilex-College/piper/mobilePhoneCtl/
- Install dependencies:
pip install -r requirements.txt --upgrade
- Ensure that piper_sdk and its hardware dependencies are properly installed and configured.
Mobile Phone App Installation
We recommend using Sensor Stream IMU+ (a paid app) for mobile phone–side data collection and transmission:
- Install the app from the official website or app store.
- Supports both iOS and Android.
App Usage Instructions
- Open the Sensor Stream IMU+ app.
- Enter the IP address and port of the computer running this script (default port: 5000), e.g.,
192.168.1.100:5000. - Select sensors to transmit: Accelerometer, Gyroscope, Magnetometer.
- Set an update interval (e.g., 20 ms).
- Tap Start Streaming to begin data transmission.
Python Script Usage
- Connect the robotic arm and activate the CAN module:
sudo ip link set can0 up type can bitrate 1000000
- Run
main.pyin this directory:
python3 main.py
- The script will display the local IP address and port—fill this into the app.
- Once the app starts streaming, the script performs attitude calculation and sends the results to the robotic arm via the EndPoseCtrl interface of piper_sdk.
Data Transmission & Control Explanation
- The mobile phone sends 3-axis accelerometer, gyroscope, and magnetometer data in real time via WebSocket.
- The script employs an Extended Kalman Filter (EKF) to compute Euler angles (roll, pitch, yaw).
- Calculated attitudes are sent to the robotic arm via piper_sdk’s EndPoseCtrl for real-time motion control.
Precautions
- Ensure the mobile phone and computer are on the same LAN, and that port 5000 is allowed through the firewall.
- Safety first—be cautious of the robotic arm moving to avoid any collisions.
- To modify port or initial pose, edit the relevant parameters in
main.py.
Related Projects
Check out these previous tutorials on controlling the AgileX PIPER robotic arm:
 Fixed Position Recording & Replay for AgileX PIPER Robotic Arm
- Continuous Trajectory Recording & Replay for AgileX PIPER Robotic Arm
![]() That’s all for this demo!
That’s all for this demo!
If you’re interested in experimenting with mobile-sensor-based robot control, feel free to check out the GitHub repo (again) and give it a try.
We’d love to hear your thoughts, suggestions, or ideas for extending this approach—whether it’s integrating ROS2 teleoperation, improving the EKF pipeline, or adding gesture control.
Looking forward to your feedback and discussions! ![]()
1 post - 1 participant
ROS Discourse General: Don't trust LLM math with your rosbags? Bagel has a solution
Hi ROS Community,
Couple weeks ago, we launched an open source tool called Bagel. It allows you to troubleshoot rosbags using natural language, just like how you use ChatGPT.
We released a new feature today to address a common concern raised by the ROS community.
![]() “We don’t trust LLM math.”
“We don’t trust LLM math.”![]()
That’s feedback we kept hearing from the ROS community regarding Bagel.![]()
![]() We heard you, so we built a solution: whenever Bagel needs to do a mathematical calculation on a robotics log, it now creates a DuckDB table and runs a clear SQL query against the data.
We heard you, so we built a solution: whenever Bagel needs to do a mathematical calculation on a robotics log, it now creates a DuckDB table and runs a clear SQL query against the data.
![]() That makes Bagel’s math:
That makes Bagel’s math:
• Transparent – you see the query and verify it manually.
• Deterministic – no “LLM guesswork.”

We’re launching this today and would love community feedback ![]() . Love it
. Love it ![]() or hate it
or hate it ![]() ? Let us know! Or yell at us in our Discord
? Let us know! Or yell at us in our Discord ![]() .
.
https://github.com/Extelligence-ai/bagel
3 posts - 2 participants